How to Grey Out a Button but Let the Player on Unity Use It Again?
When making games, you oftentimes need to animate on-screen elements to create a narrative or add that special polish to capture the thespian's interest. In the latter case, these effects' only purpose is to make the experience enjoyable.
Unity has a powerful and user-friendly animation engine that lets y'all animate annihilation your heart desires. Notwithstanding, some types of blitheness, especially the most uncomplicated ones, don't need the total power of the animation engine. You can perform them more efficiently with a more straightforward approach: Tweening techniques.
In this tutorial, you'll larn virtually tweening and how to:
- Apply tweening in GameObjects, such as assets and UI.
- Integrate the LeanTween package in your project.
- Apply rotation, displacement and scale effects to GameObjects in your projects.
- Add tweening UI elements to your projects.
By the time you're done, yous'll call up about animations not only in terms of Unity's Animator simply using other types of packages as well. As a bonus, the final sample project volition look great!
Practice y'all experience the tween?
Getting Started
Click the Download Materials button at the top or bottom of the tutorial to download the starter projection. This project requires Unity 2020.3.20f1 or later.
In Avails/RW, you lot'll find the assets used in this project. Look at the folder construction:
- Input: Files used by Unity's new input system.
- Physics Materials: The physics materials used for the ball in the projection.
- Plugins: This folder has LeanTween installed. You lot'll learn how to install LeanTween in your projects subsequently in the tutorial.
- Prefabs: The project's prefabs.
- Scenes: You'll find the sample scene here.
- Scripts: The C# scripts for this project.
- Sprites: The game fine art, courtesy of the kenney.nl industrial platformer pack.
- Text Mesh Pro: Files used by Text Mesh Pro where you create the UI. To learn more, make sure to check out the TextMesh Pro tutorial.
Whew, that was a lot of folders!
Open up the TweenBreaker scene in Assets/RW/Scenes, then click Play to try this Breakout clone. Use the correct and left arrows or the A and D buttons on the keyboard to move the paddle. Make the ball bounciness effectually and intermission as many crates as you wish.
Now, it'due south time to have a closer look at tweening.
Why Not Utilise Unity'southward Animator for Everything?
That's a bully question!
Unity already has a module capable of implementing nearly kinds of animation, and so why would you want to bring in another package? Isn't information technology redundant?
The keyword here is overkill. The animation engine is as well powerful for simpler tasks, and it may bleed precious resources from the histrion'southward figurer.
Unity'south Animator Component has a callback role that continuously calls for every Animator on the scene. Animating GameObjects without using the Animator Component is an excellent way to keep requirements low.
What is Tweening?
Simplistically, tweening, or inbetweening, is another name for interpolation. In this operation, a belongings can presume whatsoever value betwixt ii limits.
For example, imagine a GameObject that translates betwixt two points in a four second fourth dimension interval, as shown in the following effigy:
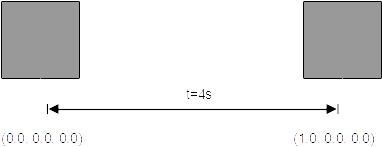
You know the position at aught seconds and iv seconds: As the effigy shows, those are the points (0, 0, 0) and (1, 0, 0). However, to breathing information technology properly, the computer needs to draw each frame.
Past getting values between those points, the animation engine can determine that at ii seconds, the GameObject should exist at (0.5, 0, 0), at one second, at (0.25, 0, 0), at 3 seconds, (0.75, 0, 0) and and then on. This simple interpolation creates animation using just uncomplicated algebraic operations.
It's possible to make this animation a fiddling fancier by using blitheness curves, as well known as tweening curves. In the previous example, to get the position of an element at any given time, you lot had to divide the total displacement by the elapsed time and add this value to the initial position.
That isn't the just way to attain the concluding value: The progression doesn't need to exist uniform. It's time to hash out tweening curves, besides called easing functions.
In this case, the interpolation is no longer linear but instead uses an capricious role to dictate how the element moves. For case, if y'all said the GameObject in the previous instance should motion similarly to a sine function, the velocity would be lower on the extremes of the role.
For more information on easing functions and their effects, cheque this reference.
Animator Component vs Tweening Techniques
When you're choosing between the two techniques, you should consider tweening'due south strengths and limitations.
Tweening is great for simple components and animations. A good rule of thumb is to use tweening whenever you desire to breathing something straightforward without sacrificing framerate.
Only trying to create complex animations solely with tweening can quickly leave of hand. The Animator Component's extra bulk and power is better suited for tackling these more elaborate animations, such equally sprite or skeletal animation.
How much overhead is at that place in the Animator Component? Allow's take a moment to compare their functioning.
Performance Comparing
You tin can use Unity'south profiler to get a improve view of what'due south going on behind the scenes in this Animator and tweening comparison. To allow for a better comparison, take an example scene, with sprites moving equally shown in the post-obit effigy:

At present, consider a scene with many of those sprites making the same movement. As their number increases, the computer requirements increase accordingly. For 300 sprites moving sideways with the animator, the Unity profiler shows:
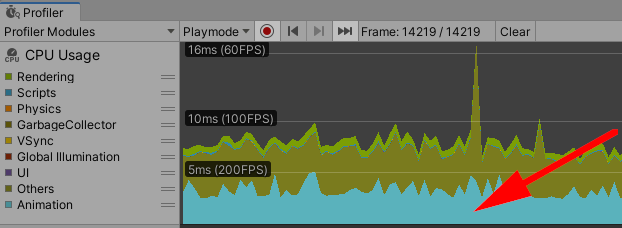
The animator is that thick blueish line.
That thick blue line is how much processing power Unity's Animator component is consuming. Selecting the line at a given bespeak shows what'southward happening in Unity's main loop:

Observe that the primary villain here is the Animator.Update() method. It's taking a lot of the principal thread processing time. If only there were a fashion to eliminate it…
That's where LeanTween enters. LeanTween is a package that provides a lean, lightweight tweening implementation. Without the need to invoke the Animator, the whole process changes dramatically. See what the Unity profiler has to say about information technology:

The main thread is different too. Take a look:

And the final animation effect is the same. This demonstration proves that eliminating the Animator Component from simpler animations makes information technology possible to heave performance and enhance your complex animations.
Adding LeanTween to Your Project
To add LeanTween to your projects, become to its Asset Store folio and add to your avails.
When you finish, it'll announced in your package explorer window in Unity. Select it then click Install. When prompted, click Import to add the packet to your project.
Now, on to using the recently added package in your game.
Animating the Paddle With the Tween Library
The first GameObject you'll breathing is the paddle. Initially, the paddle doesn't react to the brawl collisions, which doesn't seem realistic. Afterwards all, when things hitting each other in existent life, there'southward always a reaction.
For the player to experience the action, the paddle needs to react to the collision. You'll apply the translation functions to displace the paddle appropriately.
Translating Objects with LeanTween
As you already learned, yous tin can apply tweening to readapt game elements for a specific amount of time. With LeanTween, the move function takes care of full general displacement. You specify the initial position, terminal position and time that the motion should have.
Nonetheless, more than specialized functions move the GameObject in a single axis: moveX, moveY and moveZ. In this tutorial, you'll use the function specialized to motility the paddle along the Y-axis.
Bouncing the Paddle
You demand to add some displacement to the paddle and go far react to the collision with the ball. Go to Paddle.cs and supercede the entire OnCollisionEnter2D() with:
individual void OnCollisionEnter2D(Collision2D collision) { //1 if (collision.gameObject.tag.Equals("Cog")) { //2 LeanTween.abolish(gameObject); //3 LeanTween.moveY(gameObject, transform.position.y - 0.5f, 0.5f).setEaseShake(); } } This code does three main things:
- This line checks if there's a collision between the paddle and the ball (the "Cog"). In this example, the paddle can't collide with anything else, but information technology'south good practice to be clear well-nigh which collision you desire to handle.
- This function tells LeanTween to stop any other furnishings that might act on this GameObject. This step helps you avoid errors by ensuring no other animation effect operates simultaneously on the chemical element.
- Finally, this is the line that actually creates move. If it were a sentence in English language, this office would say, "move the y-axis of the gameObject half a unit downwards, over one-half a 2nd".
Now press the Play button. You lot'll see the paddle bounces up and downward for half a 2d and then returns to the initial position.
Bounce, paddle, bounce!
Notwithstanding, fifty-fifty though the paddle moves along the Y-centrality, it goes back to its initial position in the end. This happens considering of the setEaseShake() appended at the stop of LeanTween.moveY(). This ease curve defines that the movement should end at the aforementioned indicate where it started, creating the bounce issue shown on the paddle.
If you want, remove setEaseShake() and watch as the paddle gets relentlessly pounded to the bottom of the screen. Merely remember to add it back in when y'all're done.
Where are you going, paddle?
Calculation Grapheme to the Ball
In the starter projection, the ball bounces around, breaking the crates and bouncing off the paddle. However, you can go far a more interesting character.
Currently, the ball blitheness is based solely on physics: When the ball collides, it reflects and keeps moving. Simply, with tweening techniques, y'all can make the ball a fiddling more interesting.
To create some interesting graphics, begin past changing the calibration of the brawl with tweening furnishings.
Scaling the ball
All the examples thus far were about movement. All the same, you can choose a value for any given property.
To illustrate that concept, supplant OnCollisionEnter2D() in BallScript.cs with:
private void OnCollisionEnter2D(Collision2D collision) { if (collision.gameObject.tag.Equals("Player")) { hitPosition = (ballRigidbody.position.10 - collision.rigidbody.position.ten) / collision.collider.bounds.size.ten; direction = new Vector2(hitPosition, ane).normalized; ballRigidbody.velocity = direction * BallSpeed; } // 1 LeanTween.abolish(gameObject); transform.localScale = new Vector3(0.4f, 0.4f, 0.4f); // ii LeanTween.scale(gameObject, new Vector3(i.0f, 1.0f), 1.0f).setEase(LeanTweenType.dial); } Here's a code breakdown:
- These ii lines reset the GameObject behavior. In addition to
LeanTween.cancel(), the ball's scale needs to reset to avoid whatever fault propagation. If the ball collides with another element earlier the animation ends, the get-go scale volition be wrong, and, in the end, the "normal" size of the ball will be modified. - Over again, this is the lawmaking that really performs the performance. This time, still, you're scaling the GameObject instead of moving it. This scales the ball from its normal size (0.4) to 1.0 and back, thank you to the
puncheasing role.
Press the Play push button. Look at how dainty the ball behaves now:

Personalized Easing Functions
In this example, you used a predefined easing bend for the scale operation. But setEase isn't limited to only LeanTweenType easing curves.
This function also gives yous the flexibility of drawing your own curves with Unity'south aid. Add the post-obit animationCurve variable to the BallScript class:
public AnimationCurve animationCurve; Then, replace:
LeanTween.scale(gameObject, new Vector3(1.0f, 1.0f), 1.0f).setEase(LeanTweenType.punch); With:
LeanTween.scale(gameObject, new Vector3(one.0f, 1.0f), ane.0f).setEase(animationCurve); Save the script changes and go to the Hierarchy window. Expand the Role player Objects GameObject, select the Cog GameObject and wait at the Inspector window.

Here you can fix your own easing bend.
Y'all'll see a new parameter that lets you draw your easing function graphically. Y'all can besides select a predefined curve defined past Unity.

This is specially helpful for testing because yous tin can try various curves and behaviors for your scene elements in Play Mode. You tin fine-tune your game as much as you want until the game feels exactly as y'all intend.
For case, if you ready the curve to speedily arise, like this:

The ball grows chop-chop in the kickoff, and and so plateaus, like so:

All the same, if the bend is inverted:

The ball volition brainstorm growing slowly and selection up momentum:

Because you set the brawl to reset its scale for every collision in the code, it'll work with whatever bend y'all choose to elaborate. However, to avoid relying on setting the size past code, you could try a curve that comes dorsum to the initial size in the finish subsequently applying some scaling, like this:

Correct click the curve and add as many keys every bit you like to create various effects. This bend gives the ball a rubbery feeling:

Now create your own rubbery bend and select it as the Blitheness Curve for your script.
Color-Changing Furnishings
In add-on to Transform-based effects, like movement and scaling, you can also add color-changing effects.
In BallScript.cs, add one more line to the end of OnCollisionEnter2D() to permit for color effects:
gameObject.LeanColor(Colour.xanthous, 0.5f).setEasePunch(); This final line makes the ball flash yellow for half a second, producing the following effect:
Now the ball is a grapheme in the game.
In the example of color changing, you have the pick of calling the LeanTween function directly on the GameObject, rather than having to pass the GameObject in every bit an argument, which is a nice bit of syntactic sugar.
Breaking the Blocks
Currently, the blocks break, but you could add more interesting behaviors to the blocks subsequently they collide with the ball.
Open Crates.cs. You'll see the lawmaking for OnCollisionEnter2D().
In OnCollisionEnter2D(), you find but a reference to the function that increases the score as the player breaks the crates. Simply, you'll add more momentarily.
The blocks just vanish…
Rotating Objects With LeanTween
By now, you may exist wondering which numbers you could interpolate next. In this step, you'll use tweening on rotations to create a destroy animation for the crates.
In the original lawmaking, when the ball collides with the crates, it simply disappears. Now you lot'll use LeanTween to add a more interesting event to it.
Replace the entire OnCollisionEnter2D() with:
individual void OnCollisionEnter2D(Collision2D collision) { //1 gameObject.GetComponent<Collider2D>().enabled = false; //2 LeanTween.alpha(gameObject, 0.2f, 0.6f); //iii LeanTween.rotateAround(gameObject, standoff.GetContact(0).normal, 250.0f, 0.6f).setDestroyOnComplete(true); // Increases the score GameManager.Instance.IncreaseScore(one); } Here'south what the lawmaking does:
- Initially, you disable the GameObject'southward collider to avoid getting additional collisions between when crate is hit and when it finally disappears from the scene.
- To give the illusion of the crate disappearing, you use the alpha channel to decrease the chemical element's opacity to 0.2 over 0.half dozen seconds.
-
rotateAround()rotates the gameObject around the point where the collision happened, 250 degrees along 0.6 seconds. This creates a more responsive feel every bit the crate rotates effectually the point of contact betwixt itself and the brawl. Then, the code tells LeanTween to destroy the GameObject after the animation finishes, removing the elements from the scene simply afterwards the marked operations finishes.
Now press Play and run into how absurd your work looks.
Much better now!
Tweening UI Elements
You've come a long fashion in adding blitheness to the projection. Fifty-fifty though the private animations are simple, when everything comes together, the limerick is crawly.
Only if you look closely, you'll discover that not everything has dynamic behavior.
The score text is still static. It counts the points correctly, just there isn't much to it.
In Unity, UI elements are also GameObjects, so information technology should exist simple to add some effects, right? Correct!
How information technology is now.
Score Increase Animation
The GameManager has a reference to the text object and is responsible updating the score.
In GameManager.cs, find and supplant the entire IncreaseScore(int value) with:
public void IncreaseScore(int value) { gameScore += value; scoreDisplay.text = gameScore.ToString(); // i LeanTween.cancel(scoreDisplay.gameObject); scoreDisplay.transform.rotation = Quaternion.Euler(0.0f, 0.0f, 0.0f); scoreDisplay.transform.localScale = Vector3.one; // 2 LeanTween.rotateZ(scoreDisplay.gameObject, 15.0f, 0.5f).setEasePunch(); LeanTween.scaleX(scoreDisplay.gameObject, 1.5f, 0.5f).setEasePunch(); } As this code has a few new functions, analyze it by blocks:
- This block resets the score display GameObject'south advent. These lines finish whatever tweening functioning acting on
scoreDisplayand reset its rotation and scale to avoid whatsoever fault propagation during gameplay. - The functions in this block add rotation and calibration effects to the
scoreDisplayGameObject. Here, you declare a rotation along the Z-axis and a calibration forth the X-axis, with the same easing role.
Equally you may accept realized, you can perform the same operations available for every other GameObject on the UI elements. Nonetheless, while the tweening lawmaking was encapsulated inside each one, the tweening code for the score is within the GameManager course.
Now, run the game and encounter your newly animated scores add up.

Much better at present!
You tin apply LeanTween to animate other elements, not just ones where you include the script files.
Tweening the Background Color
If you lot press Play now, you lot'll run across that the game is complete, but there'south even so room for improvement. The groundwork could respond to the game actions as well. It'southward the perfect opportunity to go the extra mile and add together a few more interesting effects to the visuals.
Before jumping into the code, expand the Level Geometry GameObject in the Hierarchy window. And so select the Background GameObject and expect at its properties in the Inspector Window.
Notice that the Sprite Renderer component has a colour other than white. This helps create the illusion of iii-dimensional space, with the background existence at a altitude from the foreground.
To act on it, you'll need a reference to the Background GameObject. So, at the top of GameManager.cs, right below:
public GameObject Paddle; Add two more variables to represent the reference to the Background GameObject and how much information technology should shake, similar this:
public GameObject Background; public float backgroundShakeRate = two.0f; Now, replace IncreaseScore(int value) once again with the following:
public void IncreaseScore(int value) { gameScore += value; scoreDisplay.text = gameScore.ToString(); LeanTween.abolish(scoreDisplay.gameObject); scoreDisplay.transform.rotation = Quaternion.Euler(0.0f, 0.0f, 0.0f); scoreDisplay.transform.localScale = Vector3.one; LeanTween.rotateZ(scoreDisplay.gameObject, xv.0f, 0.5f).setEasePunch(); LeanTween.scaleX(scoreDisplay.gameObject, 1.5f, 0.5f).setEasePunch(); // i LeanTween.motion(Background.gameObject, Random.insideUnitCircle * backgroundShakeRate, 0.5f).setEasePunch(); // 2 Background.LeanColor(Color.ruby-red, 0.3f).setEasePunch().setOnComplete(() => { Background.GetComponent<SpriteRenderer>().colour = new Colour(0.38f, 0.38f, 0.38f); }); } Both move and LeanColor were already used for other elements. At present, you'll use them slightly differently:
- This lawmaking uses
LeanTween.move(). Merely in this case, the movement is performed in a random management past usingRandom.insideUnitCircleto render a randomVector2inside a unit circle (a circle with a radius of i). - This code shows how to define a lambda expression to execute equally soon equally the animation finishes. In this instance, the code redefines the Background sprite color attribute to the default value to avoid changing the colour, just like the ball size resets every animation round.
Don't forget to add the reference y'all created in the script in the editor as well! Drag the Background GameObject from the Hierarchy window to the advisable slot in the GameManager.

At present, click Play and enjoy playing your game. Look how much better it looks compared to the initial project:
The starter project. Feels like it was 20 minutes ago…
The last project, it only looks much improve.
Where to Go From Here
From here, yous can tween away anything!
You can download the completed projection files by clicking the Download Materials button at the meridian or the lesser of this tutorial and continue exploring.
Why not get a feel for creating your custom ease curves in the Unity Editor? Try replacing some easing functions for the elements in the project and change them as much as y'all like.
You tin can also browse the official LeanTween documentation for boosted details on the API.
I hope you enjoyed this tutorial. If yous have questions, comments or want to prove your terminal project, delight bring together the forums beneath!
choatebroateretted.blogspot.com
Source: https://www.raywenderlich.com/27209746-tweening-animations-in-unity-with-leantween
0 Response to "How to Grey Out a Button but Let the Player on Unity Use It Again?"
Post a Comment